Fitness4Her

Women's Fitness

  • About
  • Diet
  • Exercise
  • Journaling
  • Fitness Tools
  • Women’s Fitness Blog
  • Reviews
  • Contact

How To Dump Your Love Handles

April 4, 2011 By Karen Ficarelli

If there are 50 ways to leave your lover, certainly there must be one sure way to dump your love handles. But the truth be known, dumping your love handles requires all-over women’s fitness. To rid yourself of the fatty area around your waist known affectionately as love handles, you need to combine diet and exercise to get long-lasting results.

Exercise as well as diet must play equal parts in women’s fitness. Not only will the combination of the two help you to achieve your desired weight and size, both have the power to make you feel good and look great.

To dump your love handles once and for all, commit to an exercise program that consists of cardio or aerobic exercises to burn fat, and resistance exercises that build strength. Power walking, jogging, swimming, skating, cycling, elliptical training and playing games like tennis and racquetball are terrific ways to get the aerobic exercise you need.

Your six muscles referred to as the abs are the Transverses Abdominis, Two Internal Obliques, Two External Obliques, and the Rectus Abdominis. Working these muscles will not only give you the famed six-pack abs, they also give you better posture, for back pain relief, and help you when you bend-over, or reach for objects on upper shelves.

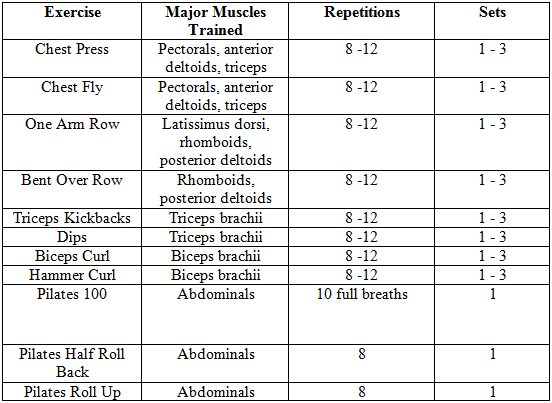
Resistance exercises that emphasize core strength are some of the best ways to tighten your abs and flatten the tummy. These exercises work the muscles in the stomach, sides and back. The following exercises are based on the Pilates principle of engaging the core muscle. To engage the core muscles you need pull your stomach in and imagine that you are pressing your belly button into your spine.

Hold this position throughout the exercise.
• Pilates 100
• Single Leg Stretch
• Pilates Roll Over
• Squat with Double Hammer Curl

For step-by-step instructions on doing any of the above exercises as well as others, simply click on the Exercise Section under Members Only. Don’t forget your towel, exercise mat and water bottle, handy tools that make your work out work for you.

Filed Under: Exercise

Long and Slow or Fast and Hard – What’s The Best Workout For You?

March 11, 2011 By Karen Ficarelli

When it comes to losing weight, many women want to know what type of workout is best. Should they engage in aerobics such as running or playing tennis or opt for a slower paced workout like walking? Women’s fitness programs that include both types of workouts might be the best way to shed the pounds and stay in shape. Plus, mixing the exercises up will keep it interesting and help you to avoid injuries that come from overworking the same muscle groups.

Burning calories is the path to losing weight and exercises that burn the most calories will certainly help you to lose weight quickly. However, high intensity exercises can lead to over stressed muscles, injuries or burn out. That’s why low stress exercises like walking are very effective for losing weight, at least for a while.

Walking is a wonderful way to get your weight loss program off to a good start. However, if you want to continue or increase your weight loss results or avoid getting bored with your activity, why not add some other aerobic activities to your program. High intensity exercises like running or playing tennis will burn many more calories in the same amount of time. Alternating the two different types of cardio activities will help you to lose weight. Add strength-training exercises to build muscle and keep your body in shape for all the aerobics.

Strength-training exercises are the secret to losing a greater amount of weight. That’s because these exercises help to build muscle and muscles burn calories in order to grow. Even after exercise these muscles are burning calories, which is another great reason to exercise regularly.

Keep in mind that if you want to lose weight and keep it off, a complete women’s fitness program is the best way to shed those pounds, worry free. One that incorporates a healthy diet with a variety of exercise is a great way to have fun and take off the weight effortlessly. So whether you like it long and slow or fast and hard, mix up your routine for the fastest and most lasting results.

Filed Under: Exercise

Upper Body Workout Illustrated

February 16, 2011 By Karen Ficarelli

Upper Body Workout Illustrated

Chest Press
Lying supine on a mat, bend your knees and place your feet hips width apart. Holding weights in your hands, extend your arms straight up above your chest, with your wrists facing away from your body so you can see the backs of your hands. Inhale lower weights to chest, exhale press weights back up, arms fully extended. Squeeze your chest muscle as you press the weights away from your chest.
{+}
Photo of Chest Press

☺Take it to the Next Level: Try a unilateral movement with legs in tabletop position keeping one arm extended as you work one side and then switch to the other side. Unilateral movements require more concentration and control, and tabletop legs really rely on a strong core to maintain stabilization.

Photo of unilateral Chest Press

Caution! Always keep the spine long with the low back pressing into the mat and never let the back of the ribcage arch

Chest Fly
Lying supine on mat, bend your knees and place your feet hips width apart. Holding the weights in your hands, extend your arms straight above your chest, with your wrists facing each other. Inhale and open arms to the side, exhale bring weights back to center line of your body. Squeeze your chest muscles as press the weights back to the center line of your body.

Photo of chest fly

☺Take it to the Next Level: Try a unilateral movement with legs in tabletop position keeping one arm extended as you work one side and then switch to the other side. Unilateral movements require more concentration and control, it takes a strong core to maintain your legs in a tabletop position.

Photo of unilateral chest fly with legs in tabletop position

Caution! Always keep the spine long with the low back pressing into the mat and never let the back of the ribcage arch

One Arm Row
Standing with your feet hips width apart, a weight in one hand with the other hand resting on your thigh, slightly hinge on the hips, keeping your spine long, shoulders reaching down your back, and your abdominals engaged. Inhale and extend your arm to lower the weight towards the ground, exhale flexing your elbow and pull your arm back with the weight to your hip. Repeat on the other side.
Photo of one arm row.

☺Take it to the Next Level: Perform the same movement with both arms at the same time. Because the body is bent forward slightly, it takes more core strength to maintain proper form.

Photo of bilateral row.

Caution! Always keep the spine extended, abdominals engaged. If low back pain is an issue, this exercise may

Bent Over Row
Standing with feet shoulder width apart, weights in both hands, slightly bend your knees, hinge on the hips to bring your torso parallel to the ground and keeping the spine long, shoulders reaching down your back, abdominals engaged, bring your arms perpendicular to the ground. Breathe in, exhale, flex both elbows and pull them up towards the ceiling, inhale and extend your elbows bring your arms back to start.

Photo of bent over row

☺Take it to the Next Level Perform the same movement with both arms at the same time. Because the body is bent slightly forward, it takes more core strength to maintain proper form.

Photo of bent over row using both arms

Caution! Always keep the spine extended, abdominals engaged. If low back pain is an issue, this exercise may

Triceps Kickback
Standing with feet hips width apart, a weight in one hand with the other hand resting on your thigh, slightly hinge on the hips keeping your spine long, shoulders reaching down your back, and abdominals engaged. Inhale flex your elbow bringing the weight to the armpit, exhale and extend your elbow pressing the weight back.

Photo of triceps kickback

☺Take it to the Next Level Perform the same movement with both arms at the same time. Because the body is bent slightly forward, it takes more core strength to maintain proper form.

Photo of bilateral kickback

Caution! Always keep the spine extended, abdominals engaged. If low back pain is an issue, this exercise may

Dips
Using a sturdy chair, sit on the edge with your hands just outside your hips with your fingers wrapping around the seat. Place your feet together with your legs pressed together. Pressing the shoulders down your back, arms fully extended, lift the chest, and slide the buttocks off the chair seat. Inhale flex the elbows to lower the buttocks towards the floor, exhale extend the elbows to lift the buttocks up.

Photo of dip.

☺Take it to the Next Level Perform the same movement with a weight resting in the lap.

Photo of dip with weight in lap.

Caution! Always keep the spine extended, abdominals engaged. If shoulders are an issue, be certain not to

Biceps Curl
Standing with your feet hips width apart, pelvis tucked under so that your tailbone points down to the ground, slightly bend your knees keeping your chest lifted, shoulders held down your back and weights in both hands with arms held at the sides, elbows at your waistline and wrists pointing forward. Breathe in, exhale and flex the elbows to bring your hands to your shoulders, inhale and extend your elbows to lower the weights back to the starting position.

Photo of biceps curl.

☺Take it to the Next Level Place both weights in one hand and do a unilateral biceps curl.

Photo of unilateral biceps curl.

Caution! Always keep the pelvis level, tailbone pointing down to the ground. Keep the upper body stable and steady by engaging the core muscles.

Hammer Curl
Standing with your feet hips width apart, your pelvis tucked under so your tailbone points down to the ground, slightly bend your knees keeping your chest lifted, your shoulders held down your back and weights in both hands with arms held at the sides, elbows at your waistline and your wrists pointing inward towards your body. Breathe in, exhale and flex the right elbow bringing the right hand to your shoulder and inhale, extend the right elbow while flexing the left elbow bringing the left hand to the left shoulder. Repeat this movement alternating arms flexing and extending the elbows.

Photo of hammer curl.

☺Take it to the Next Level Increase weights and resistance.

Photo of hammer curl with weights.

Caution! Always keep the pelvis level, tailbone pointing down to the ground. Keep the upper body stable and steady by engaging the core muscles.

Pilates 100
Lying supine on a mat with legs in tabletop position, draw the navel inward towards your spine and press your lower back down towards the mat. Keep the spine long, chin level, shoulder blades on the mat, back of the ribcage on the mat, and lower back on the mat, arms extended palms down by the sides. Breathe in, exhale, roll the upper body off the mat, looking down towards the navel, exhale for a count of five, pumping your arms up and down, inhale five counts and continue to pump your arms. Repeat ten times for a total of 100 breaths.

Photo of Pilates 100.

☺Take it to the Next Level Extend legs, toes pointing to ceiling or extend legs, hips extended to about a 45 degree angle toes pointing. Be sure to keep squeezing the inner upper thighs together.

Photo of Pilates 100 with legs extended.

Photo of Pilates 100 with hips @45 degree angle.

Caution! Always keep the navel drawn inward towards the spine, low back on the mat. If the back of the neck begins to hurt, roll the head and shoulders back to the mat or place one hand gently behind the head for added support.

Pilates Half Roll Back
Sitting up long and tall on a mat, bend your knees placing your feet firmly on the mat. Lengthen the spine by lifting the top of your head towards the ceiling and your tailbone pointing down towards the mat. Draw your shoulder blades down your back and navel inward towards the spine. Extend both arms in front of your body. Inhale, tuck the pelvis under, pointing the tailbone towards the wall in front you as you roll the low back towards the mat. Exhale when the low back just touches the mat and roll back up to the starting position. Repeat eight times

Photo of half roll back start position.

☺Take it to the Next Level Advance this move with a perfection of form.

Photo of half roll back middle position.

Photo of half roll back ending position.

Caution! Always keep the navel drawn inward towards the spine, low back on the mat. If the back of the neck begins to hurt, roll the head and shoulders back to the mat or place one hand gently behind the head for added support.

Pilates Roll Up
Lying supine on a mat with knees bent feet flat on the floor shoulder width apart, draw the navel inward towards the spine and press the low back down towards the mat. Keep your spine long, chin level, shoulder blades on the mat, back of the ribcage on the mat, and low back on the mat, arms extended palms facing the body by the sides.

Inhale bringing your arms perpendicular to the ceiling, exhale bringing the chin towards the chest and rolling the upper body off the mat, inhale and continue to roll forward and look back towards your navel, exhale lengthen your spine and roll back down to the mat one vertebrae at a time. Keep your feet on the floor throughout the movement. Repeat eight times.

Photo of Pilates bent knee roll up.

☺Take it to the Next Level Fully extend the knees pointing the toes away from the body. Rolling up, keep the heels on the floor throughout the movement.

Photo of extended legs roll up.

Photo of half roll back ending position.

Caution! Always keep the navel drawn inward towards the spine. If low back problems are an issue, it is strongly advised to keep feet flat on the mat with the knees bent while doing a roll up.

Share your workout tips by leaving a comment below!

Filed Under: Exercise

30 Minutes To A New You – Upper Body Workout

December 31, 2010 By Karen Ficarelli

Motivation is the fuel that drives internal change.

30 Minutes To A New You
Upper Body Workout

Welcome to my 30 Minutes to a New You exercise program, featuring the Upper Body Workout. As you will note in the chart below, each exercise in this workout will help you target specific muscle groups.

I’ve given you the formula for success with these workouts, by providing the number of repetitions and sets that are required for the best results.

Below the chart, I have described each of these muscle groups and explained the benefits for developing and strengthening these areas of your body.

These exercises will help you to achieve a super flat stomach, lean and sexy abs and perfectly sculpted arms. You’ll shed those love handles, eliminate stomach fat and emerge with a flat firm core. Best of all, these exercises are fun and fairly easy to do.

Upper Body Chart

Remember to keep your core engaged at all times. Practice it now and later it will become a matter of habit.

The Chest Press is the first exercise on the chart and the Chest Fly is the second exercise. Both of these work the same muscle groups.

Pectorals are the chest muscles behind your breasts. Building these muscles helps to fight the effects of gravity and sagging breasts. An alternative to plastic surgery, these exercises will strengthen the muscles in your chest wall to combat the effects that aging, childbearing and nursing have on our beautiful breasts.

Anterior Deltoids are your shoulder muscles. These muscles sit on top of the arms like caps. These muscles are needed to push a swing or door. When these muscles are developed they provide strength and reduce neck strain. Toned anterior deltoids provide shoulder width and help to accent a smaller waist.

Triceps consist of the two muscle groups in your arms. Toning your triceps is the key to sleek, sexy arms. Beautifully shaped arms look fabulous in sleeveless blouses.

The third exercise is the One Arm Row. The following muscle groups are affected by this workout.

Latissimus dorsi is a flat dorso-lateral muscle that runs from the lower to middle of your back. This muscle is responsible for stretching and extending your reach. Developing this muscle will tighten your waistline and strengthen your back. Only the One Arm Row works this muscle group.

Rhomboid muscles are located in your upper back and connect your shoulder blades to your spine. Working these muscles and keeping them flexible will help to protect you from injury when reaching overhead or playing tennis and other sports. Toning these muscles will give you a sleek sexy back that’s ideal for backless dresses and halter tops.

Posterior Deltoids are the muscles located in the back of the shoulders. Working your posterior deltoids will give you those sexy shoulders that look great in spaghetti straps. Sundresses, evening gowns, swimsuits, will all show off your well-toned arms and shoulders.

The Bent Over Row is the fourth exercise listed on the chart. It works the following muscle groups.

The Rhomboids are located in your upper back and connect your shoulder blades to your spine. Working these muscles and keeping them flexible will help to protect you from injury when reaching overhead or playing tennis and other sports. Toning these muscles will give you a sleek sexy back that’s ideal for backless dresses and halter tops.

Posterior Deltoids are the muscles located in the back of the shoulders. Working your posterior deltoids will give you those sexy shoulders that look great in spaghetti straps. Sundresses, evening gowns, swimsuits, will all show off your well-toned arms and shoulders.
The fifth exercise listed on the chart is the Triceps Kickback and the sixth is the Dip, both work the same muscle group of the Triceps brachii.

Triceps brachii is the muscle located in the underside of your arm. Developing this muscle not only makes your arms stronger, it helps to tone them and give them a nice svelte look.

The seventh and eighth exercises are the Biceps Curl and Hammer Curl. These exercises work the following muscle group.

Biceps brachii is the muscle located in the front of the upper arm. When you flex your muscle Popeye style, the biceps brachii is the muscle that you are showing off. Developing this muscle will sculpt your upper arm for that sexy sleeveless look.

The ninth exercise is the Pilates 100. This particular exercise works the Abdominals or Abs, the tenth and eleventh exercises are Pilates inspired and also work the abs.

Your abdominal muscles are found in your stomach, just under your ribcage and extending down to your pelvic area. The abs are made up of six muscles. These muscles are vital for body posture.

Your six muscles referred to as the abs are the Transverses Abdominis, Two Internal Obliques, Two External Obliques, and the Rectus Abdominis. Working these muscles will not only give you the famed six-pack abs, they also give you better posture, for back pain relief, and help you when you bend-over, or reach for objects on upper shelves.

We value your opinion!  Start a discussion; leave a comment:

Filed Under: Exercise

Lower Body Workout Illustrated

November 15, 2010 By Karen Ficarelli

Squat
If you have ever squatted down to pick up a child or something off the floor and had a hard time standing back up, you need to practice this exercise and work those muscles.

Beginning with your feet shoulder width apart, place your hands on your hips, lift your chest and draw your shoulders down your back, pull your navel inward to engage your core muscles. Inhale as you lower your hips down. Now exhale as you stand back up. Push your heels into the floor as you straighten.

Photo of Squat

☺Take it to the Next Level: Holding dumbbells in both hands, try to get the back knee low to the ground without sacrificing form.

Photo of Squat with Dumbbells

Caution! Always keep the knees behind the toes, chest lifted. Try to look slightly upward instead of down to the ground.

Lunge
Excellent for stretching the muscles in the calves and ankles, lunges are a great way to prepare your muscles for long walks or runs.

Standing with your feet together, place your hands on your hips, lift your chest and draw your shoulders down your back, pull your navel inward to engage core muscles. Inhale, step with your right foot forward and lower your left knee towards the ground, as you exhale step back with your right foot to a standing position. Hold your shoulders squarely on top of your pelvic area. Repeat on the left side, lowering your right knee to the ground and then stepping back with your left foot.

Photo of Lunge

☺Take it to the Next Level: Holding dumbbells, try to get the back knee as low to the ground without sacrificing proper form.

Photo of Lunge with Dumbbells

Caution! Always keep the knees behind the toes, chest lifted. Look straight ahead instead of down to the ground.

Shoulder Bridge
Lying supine on a mat, bend your knees and place your feet hips width apart, arms extended by your sides, palms facing downward, elbows extended with your shoulder blades reaching down your back. Draw your navel inward towards your spine and press your lower back down towards the mat keeping your chin level. Inhale, lift your hips away from the mat by rolling up one vertebrae at a time, exhale return your hips to the mat again rolling one vertebrae at a time.

Photo of Shoulder Bridge

☺Take it to the Next Level: Try doing a single leg shoulder bridge keeping the knees and thighs together without sacrificing proper form.

Photo of single leg shoulder bridge

Caution! Always keep the knees and ankles hips width apart. Look straight up to the ceiling keeping chin level. Remember to keep the navel drawn inward towards the spine.

Donkey Kicks
Beginning in quadruped, your knees directly below your hips and your hands directly below your shoulders, navel drawn inward towards your spine and your shoulders reaching down your back, inhale, lift your right heel towards the ceiling with your knee remaining bent. Exhale, lower your knee back to the mat. Repeat on the left side.

Photo of Donkey Kick

☺Take it to the Next Level: Use a dumbbell behind the knee and try to lift the leg as high as without a dumbbell while maintaining proper form.

Photo of Donkey Kick with Dumbbell

Caution! Always keep the pelvic area stable as the leg lifts and lowers. Never allow the pelvis to rock forward and back

Side Lying Leg Lifts
Lying on your right side with forearm on the mat, shoulders drawn away from your ears with your elbow directly below your shoulder, inhale, lift your right leg up with ankle flexed. Exhale, lower your leg back to the mat with your ankle extended. Repeat eight times then switch to the left side.

Photo of Side Lying leg lift

☺Take it to the Next Level: Use an ankle weight and lift leg as high as without an ankle weight while maintaining proper form.

Photo of Leg Lift with Ankle weight

Caution! Always maintain navel to spine, spine long and lengthened, and shoulders away from ears. Reach the leg as long as you can keeping the knee extended.

Pilates Hip Circles
Lying supine on a mat, with your chin level, shoulder blades reaching down your back, arms extended by your side, palms facing down, navel drawn inward towards your spine, raise your right leg, with toes pointing towards the ceiling. Inhale, circle your leg to the right, then forward then across to the left and back to the starting position. Repeat eight times then switch to the left leg.

Photo of leg pilates hip circle

☺Take it to the Next Level: Use an ankle weight and lift leg as high as without an ankle weight while maintaining proper form.

Photo of leg pilates hip circle with ankle weight

Caution! Always maintain navel to spine, spine long and lengthened, and shoulders away from ears. Reach the leg as long as you can keeping the knee extended and the pelvis level on the mat.

Pilates Long Levers
Lying supine on a mat, with chin level, shoulder blades reaching down your back, arms extended by your side with palms facing down, navel drawn inward towards your spine, bring your legs to table top (knees bent at 90 degrees directly above the hips) ankles extended and your toes pointed. Inhale, lower your toes to the mat, exhale bring your knees back to the starting position. Repeat eight times.

Photo of leg pilates long levers bent knees

☺Take it to the Next Level: Try extending the knees and lowering the entire legs to the mat maintaining proper form especially low back on the mat throughout the range of motion.

Photo of leg pilates long levers straight knees.

Pilates Single Leg Stretch
Lying supine on a mat with your legs extended on the mat, draw your navel inward towards your spine and press your lower back down towards the mat. Keep the spine long, your chin level, shoulder blades on the mat, back of your ribcage on the mat, and low back on the mat, arms extended with palms down by your sides. Inhale, draw right knee towards your body while extending your left leg with toes reaching away from your body, exhale draw your left knee towards your body, your right leg extending with your toes reaching away from your body. Repeat eight times.

Photo Pilates Single Leg Stretch

☺Take it to the Next Level: Roll the upper body off the mat. Keep looking down towards the navel with shoulder blades reaching down

Photo of with upper body rolled off the mat

Caution! Always keep the navel drawn inward towards the spine, low back on the mat.

Pilates Double Leg Stretch
Lying supine on a mat, draw your navel inward towards your spine, press your low back down towards the mat with your legs in tabletop. Keep the spine long, your chin level, shoulder blades on the mat, back of the ribcage on the mat, and low back on the mat, your arms bent with palms facing your ears. Inhale, extend your arms overhead and your legs forward. Exhale, returning to start position. Repeat eight times.

Photo of Pilates Double Leg Stretch

☺Take it to the Next Level: Roll the upper body off the mat. Keep looking down towards the navel with shoulder blades reaching down your back.

Photo of upper body rolled off the mat.

Caution! Always keep the navel drawn inward towards the spine, low back on the mat. Never allow the low back to arch away from the mat. If the shoulders are an issue, do not fully extend the arms overhead.

Pilates Bicycle
Lying supine on a mat, draw your navel inward towards your spine, press your low back down towards the mat with your legs in tabletop. Keep the spine long, your chin level, shoulder blades on the mat, back of the ribcage on the mat, and low back on the mat, your fingertips behind your ears. Inhale, roll your torso up drawing your right knee towards your body and extending your left leg away while rotating your spine bringing your left shoulder towards your right knee. Remain rolled up and switch sides bringing your left knee towards your body, your right leg extended and right shoulder towards your left knee. Repeat eight times.

Photo of Pilates Bicycle

☺Take it to the Next Level: Use an ankle weight while performing this exercise without sacrificing proper form.

Photo of Pilates bicycle with ankle weights

Start a discussion.  Tell us abut your workouts.

Filed Under: Exercise

  • « Previous Page
  • 1
  • …
  • 5
  • 6
  • 7
  • 8
  • 9
  • 10
  • Next Page »

About Karen

KAREN FICARELLI, Founder
Women's Fitness Expert
Read More about Karen

Follow Karen

For your daily dose of healthy inspiration Body, Mind and Soul!
Follow Karen on FacebookFollow Karen on Instagram

Categories

  • === Select Category Below ===
  • Women's Fitness
  • Women's Health
  • Motivation
  • Inspiration
  • Affirmations
  • Journaling
  • Nutrition
  • Healthy Cooking
  • Diet
  • Exercise
  • Reviews4Her
  • Uncategorized

Submit Product for Review

Archives

Copyright © 2025 · Fitness4Her, Inc.